Updated the website with the beginings of my Full Thrust Fleet and asteriods, today I have been painting sponge and foam asteroids and undercoating my ships.
My Fleet WIP
I added in a little base on one of the 'roids using some Brads from Ruby's card making stash. Brads are like the paper fasteners you can get with the 2 little legs that bend once you fasten paper together. In the card making world you can get legless brads, these can be found on a saturday night in the local taxi rank lol, they are actually formed paper domes that make great miniature radar dishes, I'll get some more piccies on the website tonight
TTFN
Sunday, 25 September 2011
Monday, 19 September 2011
Ruins Kit Tutorial
Hi All,
Today I am hoping to show you how easy it is to make the ruined corner from the Blu-Foam Ruins Kit.
I called it the Ruins Kit as this was the first thing that I made from the pieces in the bag.
First cut one of the larger 10mm Blu-Foam sections across the diagonal and mark out your floors and windows.


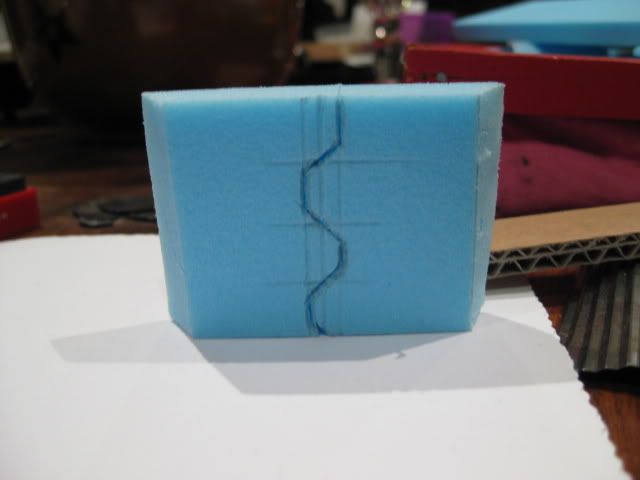
Once you have cut out your wall section, it is time to add a little damage. Cut a thin slice of foam, this will be the damaged plaster/render on the wall.


Here we can see the damaged wall and with a pen or sharp pencil draw in the underlying bricks. The sharper the pencil, the easier it will impress into the foam, so keep a sharpener to hand


After adding in some additional damage and a few bullet holes, I have used the 3mm Blu-Foam to add detail to the outer wall of the ruined corner. I have used 10mm wide strips under the windows and 5mm strips above each window. You can also see a few cracks that I have drawn into the walls


Below is the assembled corner section, you can clearly see the exposed bricks and the broken plaster. The floor section is made in the same way, the 1” tiles are drawn on and the edges are sliced back to represent broken tiles and exposed concrete. Small lengths of wire are inserted into the foam as reinforcing bars


Once based you can use the off cuts to make rubble for your ruin, you will also find that you have enough Blu-Foam to make another and still have some left to enhance your structure however you imagine.
Remember, when you come to paint this, don’t use aerosol unless you seal it first, I use old emulsion from the shed or get sample pots from the local DIY shop. You can paint it with watered down PVA first and once that dries, hit it with the spray paint, the choice is yours, have fun.
The Ruins kit is available from the shop and can be with you shortly.
Today I am hoping to show you how easy it is to make the ruined corner from the Blu-Foam Ruins Kit.
I called it the Ruins Kit as this was the first thing that I made from the pieces in the bag.
First cut one of the larger 10mm Blu-Foam sections across the diagonal and mark out your floors and windows.


Once you have cut out your wall section, it is time to add a little damage. Cut a thin slice of foam, this will be the damaged plaster/render on the wall.


Here we can see the damaged wall and with a pen or sharp pencil draw in the underlying bricks. The sharper the pencil, the easier it will impress into the foam, so keep a sharpener to hand


After adding in some additional damage and a few bullet holes, I have used the 3mm Blu-Foam to add detail to the outer wall of the ruined corner. I have used 10mm wide strips under the windows and 5mm strips above each window. You can also see a few cracks that I have drawn into the walls


Below is the assembled corner section, you can clearly see the exposed bricks and the broken plaster. The floor section is made in the same way, the 1” tiles are drawn on and the edges are sliced back to represent broken tiles and exposed concrete. Small lengths of wire are inserted into the foam as reinforcing bars


Once based you can use the off cuts to make rubble for your ruin, you will also find that you have enough Blu-Foam to make another and still have some left to enhance your structure however you imagine.
Remember, when you come to paint this, don’t use aerosol unless you seal it first, I use old emulsion from the shed or get sample pots from the local DIY shop. You can paint it with watered down PVA first and once that dries, hit it with the spray paint, the choice is yours, have fun.
The Ruins kit is available from the shop and can be with you shortly.
Monday, 12 September 2011
Shop
Finally got the shop working, i think, seems to work ok anyhow. It took a little longer than I hoped as I wanted to get the ruins plans done tonight, might make a start on them though, they are pretty simple to do and I have already made then once.
I am thinking of adding in a page that has all the plans and designs for you guys to use and am looking into a Flicker gallery so you can post your Blu-Foam creations for all to see
Catch you all later
Ian
I am thinking of adding in a page that has all the plans and designs for you guys to use and am looking into a Flicker gallery so you can post your Blu-Foam creations for all to see
Catch you all later
Ian
Colours 2011 part 2
Yesterday was just as busy as Saturday and by the time we got home and sorted I was too knackered to do a thing. I am amazed at how much interest there was in the Blu-Foam. I ended up speaking to hundreds of people and the feed back was just brilliant so thanks to you all for your interest.
Today is Ruby's Birthday so I have again been busy doing things with her.
2 Things that stood out for me at the show were the interest in the ruins kits and the little crocodile statues I had on my table, everyone loved them, I ended up giving one away to a little girl and I also let go the example ruins I had made, I haven't even photographed them LOL. I will do another set with dimensions so people can copy them, they are nice and simple to do.
I am also going to do a plan for the crocs so you can make them too for your desk or for your armies, they do not take too long to make either, that is the beauty of Blu-Foam. Every one needs one of these on their desk and they are a good little practice piece to help get to grips with the foam.

This picture was taken before he put his teeth in, retrofitting them was not difficult but the new editions will have teeth carved as part of the build. Look out for them coming shortly
Saturday, 10 September 2011
Colours 2011
well today was just amazing, my first show as an exhibitor with my new product. And we get to do it all again tomorrow!!! Even my daughter is excited, she has been a great help to me these past few days and thoroughly enjoyed the show.
I managed to get 4 types of Blu-Foam done, did the Battle Domains Mesh and made a load of flock.
I spoke to a lot of gamers and modellers and all seemed to like and be impressed with the Blu-Foam. The examples I had drew a lot of attention and certainly helped with the sales pitch.
What I need to do now is get the images and prices into the shop page. The latest one is the ruins kit, I called it the Ruins Kit purely because it was the first thing I made with it, the Ruin took me about 1.5-2 hours to do, I will take some piccies of the ruins tomorrow and get everything posted on here shortly. The mesh is stuff I have used for my leaded windows but I also made some electric/laser fences. The mesh can also be used for floorplates and bulkhead detailing. Again images and detailed instructions to follow soon.
Sunday, 14 August 2011
Room and Corridor kits
Ok it has been a while since I posted, there has been quite a bit going on. I have been working on a book, wood turning and of course working full time and helping Ruby in her job too in the evenings.
I have been making flock and my own trees with some success and making other bits and bobs for wargaming.
Importantly for this site I have been developing the product range and have come up with the Room and Corridor foam kits. Each kit contains 3 10mm wall pieces about 12" long, 2 corridor pieces at 6-7" long and 1 room floor piece that is about 7" square. They are available from the shop for £2.50
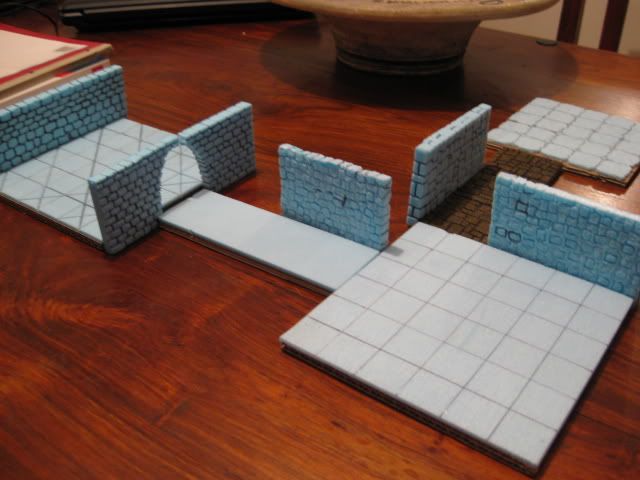
What can you do with this stuff I hear you ask, well here are some images of what I am currently working on, I hope to have these ready for Colours 2011, my local wargames show here in Newbury. I will be there this year as a trader so pop over and say Hi.
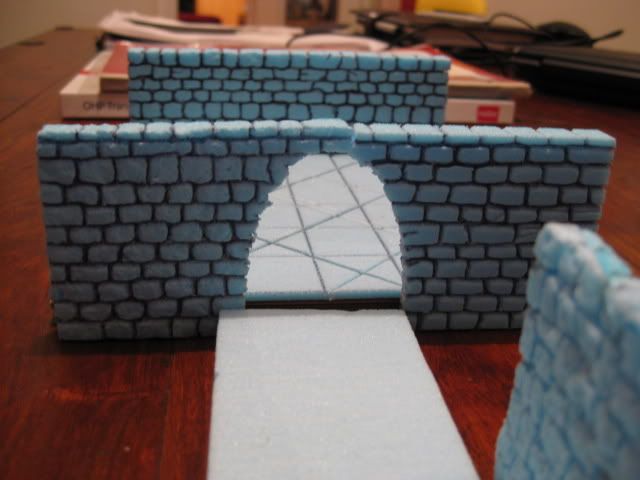
 Here we see a couple of walls, some rooms and corridors all in different stages of construction
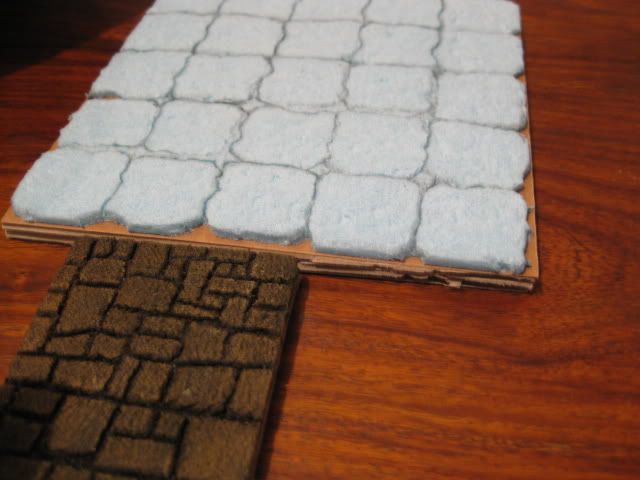
 This image shows a room panel glued to a cardboard base and the tiles have been carved into the foam with a standard biro. The corridor section in the foreground has been done the same way and painted.

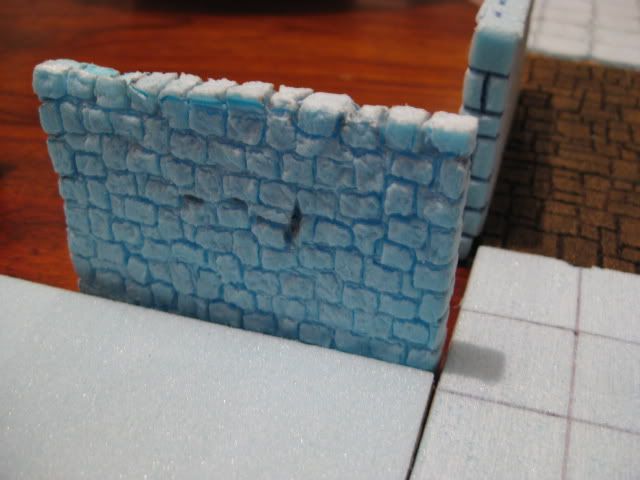
This picture shows a carved wall section. This was done using an old pencil. Get one with a rubber on the end and remove the rubber from the metal ferrule. Shape the ferrule into a brick shape with some needle nose pliers and using a little pressure puch the ferrule into the foam. To prevent the wall looking too regular I rotated the pencil as I did the bricks.
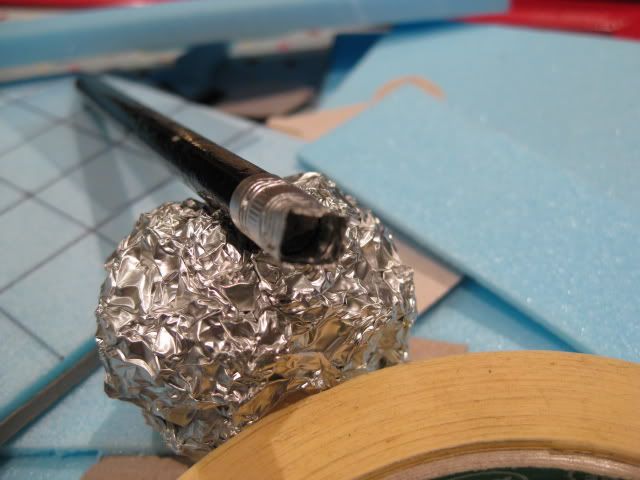
 This is a shot of the formed ferrule, very simple and a lot quicker that using a pen or pencil to draw the blocks into the foam. You can see under the pencil a ball of tinfoil, this ball is rolled and dabbed onto the carved foam to add texture to the surface. In the carved wall picture above there is another section of wall visible, if you look closely you will see how smooth it looks compared to the wall in the foreground.
 Here we see the beginings of another corridor section and an Archway or doorway carved into the wall section.
This all looks great for the dungeon builders and fantasy gamers but what about sci fi?
 Here is a sneak preview of something I am working on for Terragenesis, I might expand this into a full 3D Space Hulk terrain set, my daughter enjoys playing the game and a special 3d setup would be amazing so watch this space lol.
 This is a prototype bulkhead door made from a piece of 10mm foam
I have been making flock and my own trees with some success and making other bits and bobs for wargaming.
Importantly for this site I have been developing the product range and have come up with the Room and Corridor foam kits. Each kit contains 3 10mm wall pieces about 12" long, 2 corridor pieces at 6-7" long and 1 room floor piece that is about 7" square. They are available from the shop for £2.50
What can you do with this stuff I hear you ask, well here are some images of what I am currently working on, I hope to have these ready for Colours 2011, my local wargames show here in Newbury. I will be there this year as a trader so pop over and say Hi.
This picture shows a carved wall section. This was done using an old pencil. Get one with a rubber on the end and remove the rubber from the metal ferrule. Shape the ferrule into a brick shape with some needle nose pliers and using a little pressure puch the ferrule into the foam. To prevent the wall looking too regular I rotated the pencil as I did the bricks.
This all looks great for the dungeon builders and fantasy gamers but what about sci fi?

Monday, 20 June 2011
Tomb Kings Scenery
OMG, I came second in the Terragenesis competition
Here are some images of the completed pyramid that I entered for the competition


Monday, 6 June 2011
Tomb Kings Necropolis Knights
ok here i am again, currently basing my Necropolis knights
I covered the bases in 3mm foam and stamped them using a heiroglyph stamp
 I then carved the images of the stamp into the foam using a fine pointed tool
 Here i have added a couple of coats of paint to the foam and am in the process of pinning the snakes to the bases


 3mm Foam is available from the shop tab, I should be adding more stuff there soon
I covered the bases in 3mm foam and stamped them using a heiroglyph stamp


Tomb Kings
Finished the challeng at Terragenesis, the link to the full post is here. I wont repeat the whole process here but I will show some of the piccies. If you have any questions then feel free to ask them.
This is the front of the finished gateway, as i mentioned before it is card board covered in 3mm foam and carved with a pen and craft knife before painting. The pyramid crenellations are made from card , the altar is a Hirst Arts piece and the small carved columns are made from 25mm foam pieces.
 Here we can see some more Hirst Arts parts being integrated into the pyramid. I have done the initial paint job on the main blocks of the pyramid.

This is one of two completed monoliths, they are card with 3mm foam cladding and the base block is 25mm foam. Again they have been carved with a biro and craft knife before painting. I have added in the odd skull and scarab beetle salvaged from some sprues.

Here is the finished pyramid complete with a couple of Tomb King warriors I got from ebay. I have made the flooring look like marble and painted in some ley lines on the top level. The altar is removable so I can place the casket of souls or any unit I need on there

This is the front of the finished gateway, as i mentioned before it is card board covered in 3mm foam and carved with a pen and craft knife before painting. The pyramid crenellations are made from card , the altar is a Hirst Arts piece and the small carved columns are made from 25mm foam pieces.


This is one of two completed monoliths, they are card with 3mm foam cladding and the base block is 25mm foam. Again they have been carved with a biro and craft knife before painting. I have added in the odd skull and scarab beetle salvaged from some sprues.

Here is the finished pyramid complete with a couple of Tomb King warriors I got from ebay. I have made the flooring look like marble and painted in some ley lines on the top level. The altar is removable so I can place the casket of souls or any unit I need on there

Monday, 25 April 2011
Tomb Kings Terrain
With the imminent arrival of the new Tomb Kings book and minis, I decided I would make a few bits of terrain for my TK forces. I decided to begin with a pair of monoliths, a Pyramid and gateway to a King,s Domain.

First off I made a monolith frame from cardboard, when finished this will measure 60mm across the base and be 120mm high with a further 25mm for the height of the plinth. I have used ordinary cardboard here, at this point i made the dimensions 6mm smaller as I am going to clad the cardboard with 3mm foam.

Here is the foam clad monolith, I have carved in the blocks using a pen and added striations into the surface by cutting across the surface with my knife, small tears and snags are a good thing here as I am looking for a worn sandstone look. I actually took a tair of tweezers and pulled out more bits to add to the weathering.

Here are the 2 monoliths on plinths and hardboard bases, neither of which are in any state of readyness yet, I have to carve them and coat everything in polyfilla before going over the details and painting in appropiate sandy colours
Friday, 1 April 2011
Opening Shots
Well, I finally got around to putting a blog together. My intention here is to showcase some of the terrain and scenery items I have made, share some ideas and tips with fellow modellers and to offer supplies via my shop once it all gets up and running.
I am a member of TerraGenesis, THE greatest terrain site online. Special items that I do will appear on there as well as here. Their link is Here.
I have been wargaming for 20 Years on and off, I play 40K, WHFB, Space Hulk and used to play DBA, Rennaisance and Full Thrust as well as a raft of other systems that I have tried over the years.
Subscribe to:
Comments (Atom)